
How to Make a Buttonhole Without a Sewing Machine: DIY Guide
Making a buttonhole by hand is easy. You do not need a sewing machine. You can sew a neat buttonhole. It’s simple and fun. Follow these steps to learn how.
What You Need
Before we start, gather your tools. You need:
- Needle
- Thread
- Scissors
- Fabric piece
- Marking pencil
- Ruler or measuring tape
These tools help you sew a buttonhole. You can find them at home or a store.
Step 1: Mark the Buttonhole
First, mark the buttonhole spot. Use a ruler to measure the button. Measure its length. Add a little extra space. Draw a line on the fabric. This line shows where the buttonhole will go.
Make sure the line is straight. Use the marking pencil. It helps you see the line clearly.

Credit: www.cucicucicoo.com
Step 2: Prepare the Thread
Now, take your thread. Cut a piece that is long enough. Thread it through the needle. Tie a knot at the end. Make sure the knot is big. It keeps the thread from slipping through the fabric.
Use thread that matches the fabric. It makes the buttonhole look nice.
Step 3: Sew the Buttonhole
Start at one end of the line. Push the needle through the fabric. Pull the thread all the way through. Now, make small stitches along the line.
Keep the stitches close together. They should be tight and even. This makes the buttonhole strong.
Buttonhole Stitch
The buttonhole stitch is special. Here’s how to do it:
- Push the needle through the fabric.
- Before pulling it all the way, loop the thread under the needle.
- Pull the needle through, tightening the loop.
This creates a knot at the edge of the buttonhole. Repeat this stitch along the line. It makes the buttonhole neat and firm.
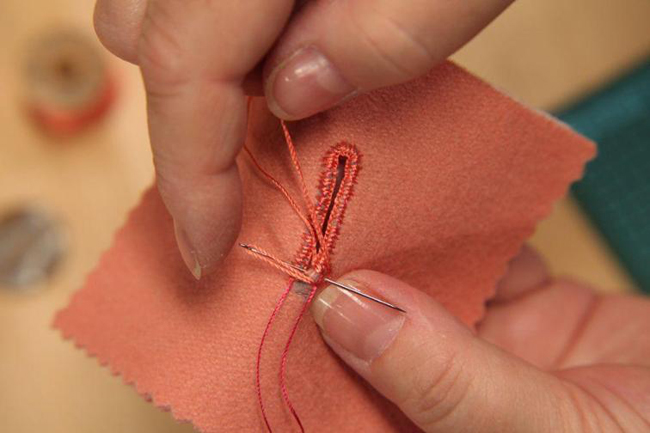
Credit: www.craftsy.com
Step 4: Cut the Buttonhole
Once you finish sewing, it’s time to cut. Use scissors to carefully cut along the line. Be careful not to cut the stitches.
Go slowly. The cut should be straight and clean. This is where the button will go through.
Step 5: Reinforce the Buttonhole
Your buttonhole is almost done. Reinforce the edges with more stitches. This prevents fraying. It also makes the buttonhole last longer.
Use the same buttonhole stitch. Go around the edges one more time. Make sure all threads are secure.
Step 6: Test the Buttonhole
Now, test your buttonhole. Try to fit the button through it. It should go through easily. If it doesn’t, adjust the size.
Carefully snip a bit more if needed. But be careful not to make it too big.
Tips for Perfect Buttonholes
Here are some tips:
- Practice on scrap fabric first. It helps you get better.
- Choose the right needle size. A fine needle works best for thin fabric.
- Use good-quality thread. It makes the buttonhole strong.
- Keep stitches even. It makes the buttonhole look tidy.
These tips help you make perfect buttonholes every time.
Common Mistakes to Avoid
Avoid these mistakes:
- Don’t cut the buttonhole before sewing. Sew first, then cut.
- Don’t use too much thread. It makes the buttonhole bulky.
- Don’t rush. Take your time for neat stitches.
Being careful helps you avoid these mistakes.
Frequently Asked Questions
What Materials Are Needed For Hand-sewn Buttonholes?
You need a needle, thread, scissors, and fabric. These are essential for making buttonholes by hand.
How Do I Mark The Buttonhole Placement?
Use chalk or a fabric pen. These tools help mark the exact spot for your buttonhole.
Can Beginners Sew Buttonholes By Hand?
Yes, beginners can do it. Start with simple fabrics and practice to improve your skills.
How Long Does It Take To Sew A Buttonhole?
It takes about 10-15 minutes per buttonhole. Time may vary based on experience and fabric type.
Conclusion
Making a buttonhole by hand is simple. You don’t need a sewing machine. With practice, you can sew neat buttonholes. Just follow these steps.
Remember, gather your tools first. Mark the buttonhole spot. Sew with small, even stitches. Cut carefully, and reinforce the edges. Test the buttonhole with a button.
Soon, you will be a buttonhole expert. Keep practicing. Happy sewing!

