

How to Install Ro Water Filter System [Step-by-Step Guide]
Do you want clean drinking water at home? Installing an RO water filter system is a good way to get it. This guide will show you how to install the system. Follow these steps for safe and clean water.
What is RO Water Filter System?
RO stands for Reverse Osmosis. This system removes impurities from water. It makes your water clean and safe to drink. The system uses a special membrane. This membrane filters out bad stuff like chemicals and germs.
Credit: oceanicwater.com
Why Install an RO Water Filter System?
There are many reasons to install an RO water filter system. First, it gives you clean water. Second, it removes harmful substances. Third, it can improve the taste of your water. Fourth, it can save you money. You will not need to buy bottled water.
Tools You Will Need
Before you start, gather these tools:
- Drill
- Screwdriver
- Adjustable wrench
- Pliers
- Teflon tape
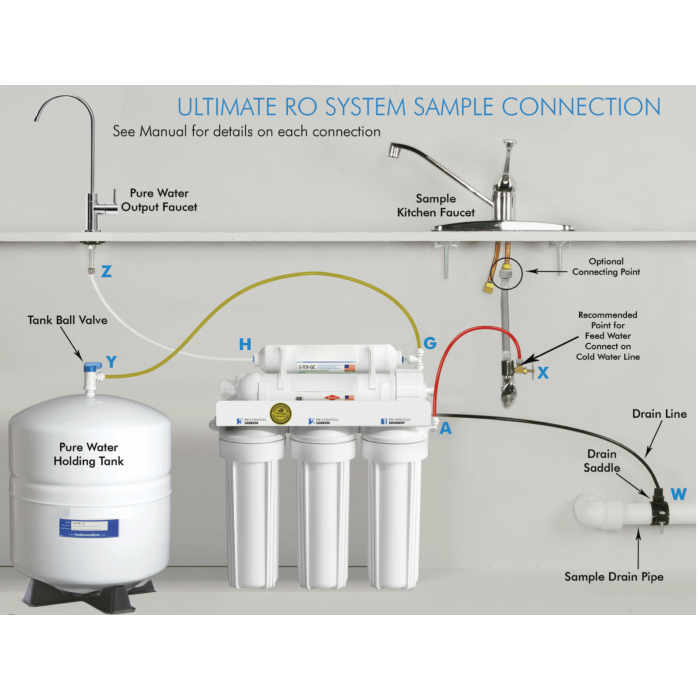
Parts of the RO Water Filter System
The system has several parts. These include:
- Pre-filter
- RO membrane
- Post-filter
- Storage tank
- Faucet
Step-by-Step Installation Guide
Follow these steps to install your RO water filter system:
1. Choose A Location
Pick a spot under your kitchen sink. Make sure there is enough space. The system and storage tank need room.
2. Install The Faucet
Drill a hole in your sink or countertop. The hole should be 1/2 inch to 1 inch wide. Insert the faucet into the hole. Tighten the nut underneath with a wrench.
3. Install The Pre-filter
Mount the pre-filter housing to the wall. Use screws and a drill. Connect the cold water line to the pre-filter inlet. Use Teflon tape on the threads. Tighten with a wrench.
4. Install The Ro Membrane
Open the RO membrane housing. Insert the membrane. Close the housing tightly. Connect the pre-filter outlet to the RO membrane inlet.
5. Install The Post-filter
Mount the post-filter housing next to the RO membrane housing. Connect the RO membrane outlet to the post-filter inlet. Use Teflon tape on the threads. Tighten with a wrench.
6. Connect To The Storage Tank
Connect the post-filter outlet to the storage tank inlet. Use Teflon tape on the threads. Tighten with a wrench. The storage tank should be placed near the system.
7. Connect To The Faucet
Connect the storage tank outlet to the faucet. Use Teflon tape on the threads. Tighten with a wrench. Make sure all connections are secure.
8. Flush The System
Turn on the cold water supply. Open the faucet. Let the water run for 10 minutes. This will flush out any dirt or air.
9. Check For Leaks
Inspect all connections. Look for any leaks. Tighten any loose connections.
Maintenance Tips
Regular maintenance is important. Change the filters every 6 to 12 months. Check the system for leaks regularly. Clean the RO membrane every 2 years. Follow the manufacturer’s instructions.
Frequently Asked Questions
What Tools Are Needed To Install A Ro Water Filter?
You need a wrench, tubing cutter, and a drill.
How Often Should Ro Filters Be Replaced?
Replace RO filters every 6-12 months for best performance.
Can I Install A Ro System Myself?
Yes, most RO systems come with easy-to-follow instructions.
How Long Does It Take To Install A Ro Filter?
It typically takes about 2-3 hours to install.
Do I Need A Plumber To Install A Ro Filter?
No, you can do it yourself with basic tools.
What Are The Benefits Of A Ro Water Filter?
RO filters provide clean, safe, and great-tasting water.
Conclusion
Now you know how to install an RO water filter system. Follow the steps carefully. Enjoy clean and safe drinking water at home. Regular maintenance will keep your system working well.

Credit: m.youtube.com
Frequently Asked Questions
| Question | Answer |
|---|---|
| How often should I change the filters? | Change the filters every 6 to 12 months. |
| Can I install the system myself? | Yes, follow the step-by-step guide. |
| What is an RO membrane? | It is a filter that removes impurities. |