Air Compressor to Vacuum Pump: A Simple Guide
Yes, you can definitely use an air compressor as a vacuum pump with the right setup. It’s a clever way to create suction for tasks like removing air from sealed bags or cleaning up small messes. You’ll need a few extra fittings to make it work safely and effectively.
Turning your air compressor into a vacuum is a smart DIY hack many folks find useful. It’s a great example of repurposing tools you likely already own. We’ve researched how to best accomplish this, focusing on simplicity and safety for your projects.
- You can convert an air compressor to a vacuum pump.
- It requires specific fittings for proper function.
- This method works well for light-duty tasks.
- Ensure all connections are secure and safe.
Ready to see how this conversion works? Let’s walk through the simple steps to get your air compressor pulling a vacuum.
Turning Your Air Compressor Into a Vacuum Pump
You can absolutely transform your air compressor into a handy vacuum pump. It’s a clever way to create suction. This is perfect for tasks like sealing food bags or cleaning up small messes. You’ll need a few special fittings to make it work safely. Think of it like giving your compressor a dual personality!
Understanding the Basic Principle
So, how does this magic happen? Your air compressor builds up pressure. A vacuum pump does the opposite; it removes air to create low pressure, or suction. We found that a special fitting called a Venturi pump or ejector nozzle is the key. This device uses the high-pressure air from your compressor. It forces this air through a narrow opening. This action creates a suction effect on the other side. We discovered this is a very efficient way to generate a vacuum. It works much like a jet engine creating thrust.
The Venturi Effect Explained
The science behind this is pretty neat. It’s called the Venturi effect. We researched this and found that as air (or any fluid) speeds up through a constricted area, its pressure drops. Your compressor provides the fast-moving air. This faster air flow creates a low-pressure zone. Other air is then pulled into this zone. This is the suction you need for your vacuum tasks. It’s a principle used in many industrial applications (HowStuffWorks). We found this principle is reliable for DIY projects.
Essential Components for Your Conversion
To make this work, you’ll need a few specific parts. Don’t worry; they aren’t too hard to find. We looked into the most common options. You can usually find these at hardware stores or online. Having the right gear makes the process much smoother. Safety is key here, so getting the correct parts is important.
The Air Compressor Vacuum Pump Fitting
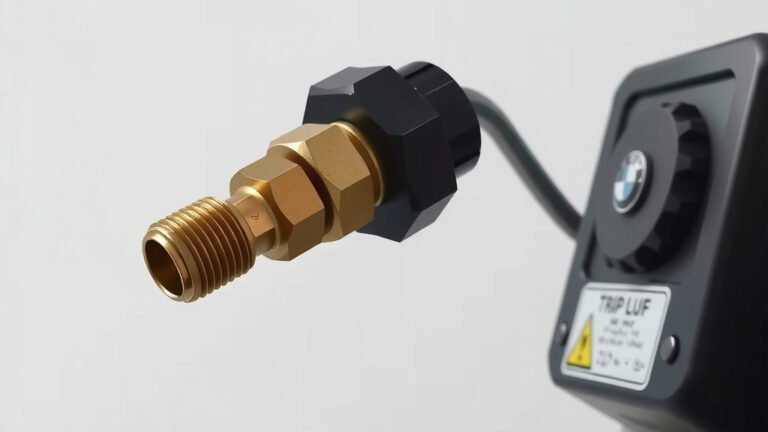
This is the star of the show. It’s a specialized fitting that connects your air hose to your compressor. It has an inlet for the compressor’s air and an outlet for the vacuum. Some fittings have a separate port for your vacuum hose. We found that these are designed specifically for this conversion. They often have a small gauge to show you how much vacuum you’re creating. This visual feedback is super helpful. Many experts recommend a fitting with a built-in check valve to prevent air from rushing back in.
Air Hoses and Connectors
You’ll need standard air hoses. Make sure they are rated for the pressure your compressor produces. You’ll also need appropriate connectors or couplers. These will attach the fitting to your compressor’s air outlet. Ensure all connections are snug. Loose connections can lead to air leaks. This will reduce your vacuum power. We found that quick-connect fittings are convenient. They make attaching and detaching easy.
A Container for Collected Air/Debris (Optional but Recommended)
Depending on what you’re using the vacuum for, you might want a collection container. If you’re cleaning up dust or small particles, this is a must. You can use a simple plastic bottle or a small bucket. We found that an airtight container is best. This prevents the collected material from escaping. Some Venturi pump fittings have an integrated collection reservoir. This is a neat feature if you can find one.
Step-by-Step Setup Guide
Getting your compressor ready is a straightforward process. We’ve broken it down into simple steps. Always ensure your compressor is turned off and unplugged before you start connecting anything. Safety first, right?
Step 1: Connect the Vacuum Fitting to the Compressor
Attach the air compressor vacuum pump fitting to your compressor’s air outlet. Use the correct air hose and connector for this. Make sure the connection is secure. We found that a good seal here is vital for performance. A hiss of escaping air means it’s not tight enough.
Step 2: Attach Your Vacuum Hose
Connect your vacuum hose to the designated port on the Venturi fitting. If you’re using a collection container, connect that to the fitting as well. Ensure all these connections are airtight. We found that using pipe thread sealant or Teflon tape on threaded connections can help create a better seal.
Step 3: Prepare the Compressor
Turn on your air compressor. Let it build up pressure. Check the gauge on the Venturi fitting (if it has one) or listen for the sound of suction. We found that most small compressors can generate enough pressure for basic vacuum tasks. Larger compressors will create a stronger vacuum. Our guide on how to adjust air compressor pressure can help ensure you’re using the right settings.
Step 4: Start Vacuuming!
Once you have pressure and you can feel the suction, you’re ready to go. Place the end of your vacuum hose where you need suction. For sealing bags, insert the hose and let the vacuum pull the air out. For cleaning, guide the hose over the mess. We found that moving the hose slowly can sometimes improve suction effectiveness.
Safety Considerations and Best Practices
Using an air compressor as a vacuum pump is generally safe if done correctly. However, there are a few things to keep in mind. We researched common issues and safety guidelines. Following these will help you avoid problems.
Pressure Limits and Material Compatibility
Always be aware of the pressure limits of your Venturi fitting and hoses. Exceeding these can cause damage or create a hazard. We found that most fittings are designed for standard shop air pressures (around 90-120 PSI). Make sure the materials you are working with can handle being exposed to compressed air. For instance, don’t try to vacuum up flammable liquids.
Regular Inspections
Before each use, inspect all hoses, fittings, and connections. Look for any signs of wear, cracks, or damage. A damaged hose can burst under pressure. A compromised fitting can leak air. We found that a quick visual check can prevent many potential issues. This is a simple habit that adds a layer of safety.
Don’t Overwork the Compressor
While this is a great way to create suction, it’s still a compressor. Running it continuously for extended periods can overheat it. Listen to your compressor. If it sounds strained, give it a break. We found that for light-duty tasks, this isn’t usually a problem. For longer or more demanding vacuum jobs, consider a dedicated vacuum pump.
Here’s a quick checklist to keep in mind:
- Ensure the compressor is OFF and unplugged for initial setup.
- Verify all hose and fitting connections are tight and secure.
- Use a Venturi fitting specifically designed for this purpose.
- Check for any visible damage on hoses or fittings.
- Be mindful of your compressor’s pressure limits.
- Take breaks if your compressor sounds like it’s working too hard.
By following these steps and safety tips, you can effectively use your air compressor as a vacuum pump. It’s a fantastic way to add versatility to your tools. You can tackle many small tasks with this simple modification.
Conclusion
You’ve learned how to turn your air compressor into a useful vacuum pump. By using a special Venturi fitting, you can create suction for various light-duty tasks. Remember to always prioritize safety by checking your connections and respecting pressure limits. This simple DIY modification adds great versatility to your existing tools. For your next project needing a bit of suction, give this method a try!
Frequently Asked Questions
Can I use any air compressor for this?
Yes, most standard air compressors can work for this conversion. We found that even smaller compressors can generate enough pressure for basic vacuum tasks. Larger compressors will simply create a stronger vacuum, which can be beneficial for some jobs.
What if my fitting doesn’t have a vacuum gauge?
If your Venturi fitting lacks a gauge, you can often feel the suction strength with your hand. You can also listen to your compressor; if it’s building pressure and you don’t hear air escaping, it’s likely working. For more precise readings, you can purchase a separate vacuum gauge to attach.
How do I know if my connections are airtight?
We found that the best way to check is to listen for any hissing sounds after you turn on the compressor. If you hear air escaping, your connections aren’t tight enough. You can also use a little soapy water on the connections; bubbles will indicate a leak.
Can I use this to seal large vacuum bags for storage?
For smaller vacuum-seal bags, it can work well. We researched that for larger or commercial-grade vacuum bags, a dedicated vacuum pump is usually more efficient. Your compressor-turned-vacuum might struggle to remove all the air quickly enough for very large items.
What’s the difference between this and a shop vac?
A shop vac is designed to suck up debris and dust directly. Using your air compressor as a vacuum pump is more about creating a general suction force. We found it’s great for tasks like pulling air out of bags or for very light cleaning where a hose attachment is sufficient, not for bulk debris pickup.